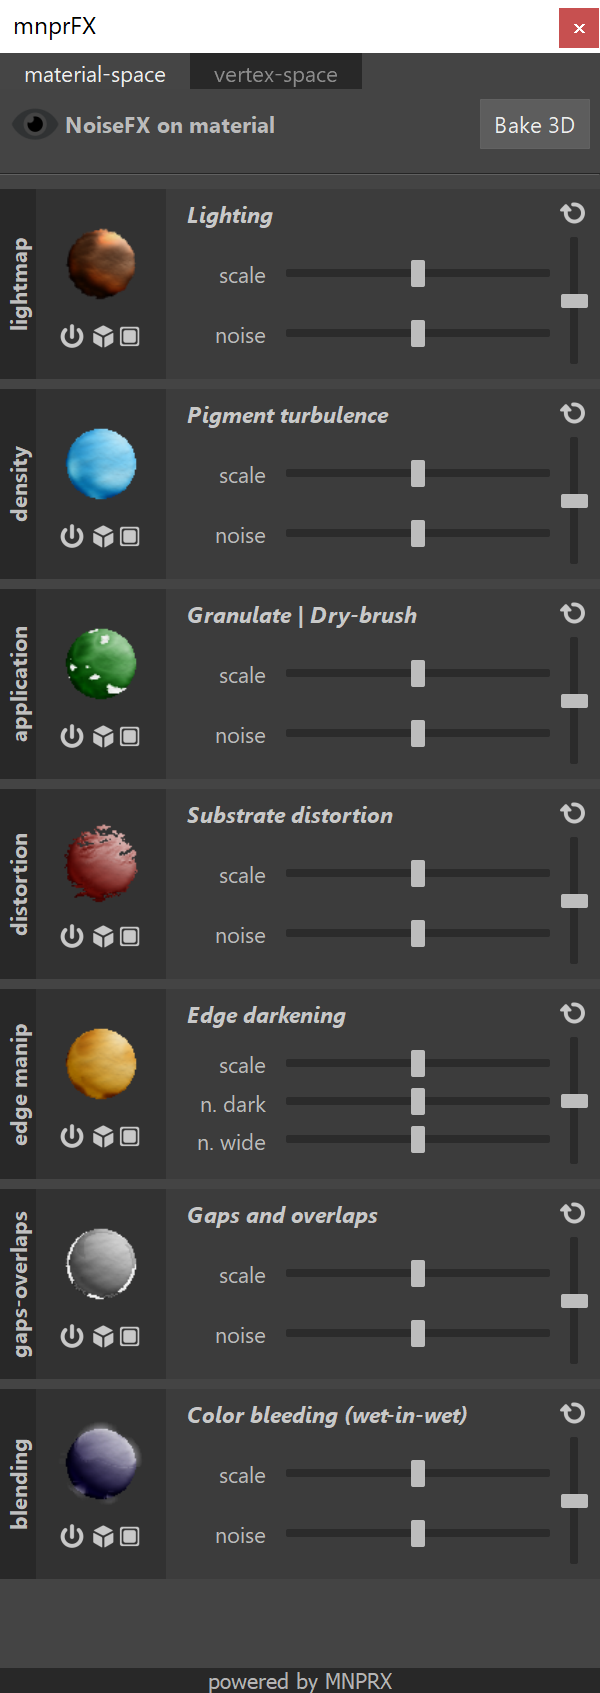
NoiseFX is a tool which grants procedural control of effects at the material level of control. The tool can be opened by clicking on the nFx shelf icon and shares the same window with PaintFX.

Each MNPRX material supports NoiseFX, but the effects driven by NoiseFX depend on the loaded style. To use NoiseFX select an object with an MNPRX material and modify the desired slider.
From top to bottom, these are the different elements of the NoiseFX tool.

On the top-left, you will find an eye icon which toggles the parameter view. This will allow you to observe the control parameters that you are currently affecting through the Noise Widgets.
On the top-right, you will find the Bake 3D button. This button toggles the deformed setting in the mnprx materials, baking the current 3D position of objects. Baking is especially useful to attach the current NoiseFX patterns to an animated/deformed object. If the 3D position is not baked, NoiseFX might seem to float in 3D space on animated objects, instead of moving with them.
Noise Widgets
Each style has different effects, therefore, the noise widgets (sections) will vary depending on the currently loaded stylization. Each widget (section) handles a specific effect/behaviour within the style e.g., Lighting, Pigment turbulence, Color bleeding.
On the left side of each widget, you will find a term for the generalized behaviour of each effect. This is followed by a Sphere, visually showcasing what the behavior/effect does. Underneath the Sphere, you will find two buttons.

This button will toggle the NoiseFX on/off to visualize the difference that the noise creates for the stylization.

This button will toggle between 3D noise and 2D noise for the material.
Deprecated: Only use 3D noise, and use the Bake 3D button to the top right to attach the 3D noise to animated objects.
Modifying Noise
Modifying noise is quite simple, simply select the object with the material that you wish to modify and use one of the three relative sliders.
- Scale - The scale slider modifies the scale of the 3D/2D noise for the specified effect.
- Noise - The noise slider modifies the contrast (how strong it is) of the noise for the specified effect. Keep in mind that noise is composed out of positive and negative values and the contrast amplifies the noise in both directions.
- Shift - The shift slider is the vertical slider on the far right and shifts the noise towards the positive or negative values, accordingly.
Depending on the widget (see Edge Manipulation widget), it may present different names for the Noise slider, but they also just modify the contrast (how strong it is) of the noise for the specified effect.
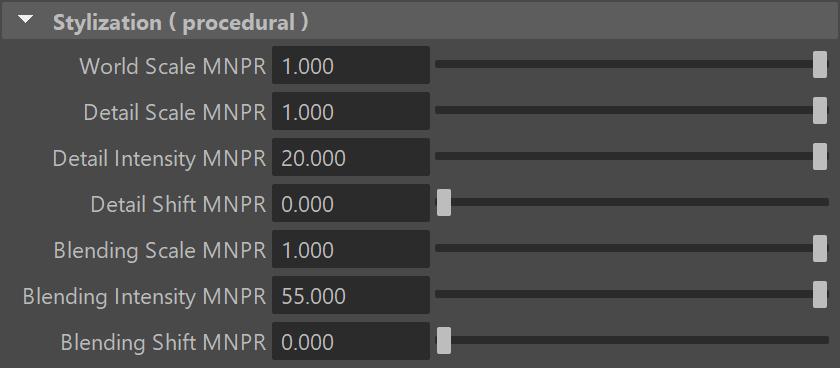
The relative sliders activate and modify procedural attributes on each material, which can be found in the attribute editor to the right.

Resetting the Noise

If you wish to reset all of these values and the NoiseFX attributed to it, click on the icon at the top-right of the desired widget within the NoiseFX window.
Showcase
FAQ
Can I change the type of noise that NoiseFX uses?
Yes, but you will need to modify the material within the ShaderFX graph to do so.
- Remember which attribute is being modified within the material’s Stylization (procedural) section when modifying the desired NoiseFX values.
- Open the ShaderFX graph within the desired material.
- Change the CustomGraph node at the top-level from
falsetotrue. This will avoid overwriting your changes upon a ShaderFX update. - Navigate to:
Material -> ForwardRenderPasses -> Color-DiffusePass -> Control Sets -> Procedural Control -> X Procedural, whereXis the procedural attribute that modifies the desired effect. - Depending on what kind of noise algorithm you use, you can hook up your own nodes within the Noise2D or Noise3D node.
Can I add support of NoiseFX to my own custom ShaderFX materials?
Yes, you can add support of NoiseFX to your own custom ShaderFX materials.
- Import the mnpr_controlSets.sfx file (found on the shaders folder of your MNPRX installation), which contains all the nodes required to support NoiseFX.
- Plug them as the last targets of a Multi Pixel Shader node (4,5,6,7) for the styles to interpret them correctly.
You can take existing MNPRX materials as reference, the control sets can be found within the ShaderFX graph editor ->
Material -> ForwardRenderPasses -> Color-DiffusePass.