Download MNPRX
Get a commercial or non-commercial version of MNPRX here.
Make sure to also take a look at the system requirements below:
| Requirements | Minimum | Recommended | Notes |
|---|---|---|---|
| Autodesk Maya | 2018.7 | 2020.4 | 2018, 2019, 2020 and 2022 are supported |
| OS | Windows 10 | Windows 10 | Linux and Mac versions developed for interested Studios, contact us |
| VRAM | 2 GB | 8 GB | Higher resolutions and scene complexity require more VRAM |
| Memory | 8 GB | 16 GB | As much as your Maya scene requires |
Installation
- Extract the contents of the downloaded zip file anywhere you want e.g., documents, desktop, a shared drive, you get the drill.
- Drag and drop the install.mel file from the MNPRX folder into one of the Maya viewports.
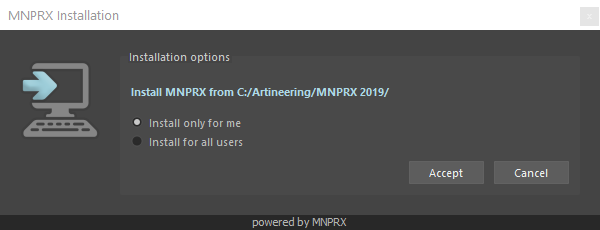
- The installation window will appear (see image below).
- Install MNPRX from this folder ‘only for you’ or install MNPRX from this directory ‘for ALL users’ (requires admin rights)
- If successful, a prompt will appear in Maya, asking you to restart the application, please do so to show all changes.
- Once you open Maya again, the MNPRX shelf will appear alongside the other shelves.
- To test if everything is working correctly, switch to the MNPRX shelf and click on the
testbutton. - If MNPRX has not been activated before, the activation prompt will appear.
Installations for a single user will ALWAYS take precedence over installations for all users. Make sure to uninstall MNPRX if you have a previous ‘single user’ installation and want to use the installation for ‘all users’, instead.
Upgrading from Demo license
If you previously activated a Demo version and wish to activate another license, follow these steps:
- Delete the
MNPRX.licfile found in:- “Only for you” installations ->
Documents/maya/MNPRX.lic - “For all users” installations ->
Program Files/Common Files/Autodesk Shared/Modules/Maya/MNPRX.lic
- “Only for you” installations ->
- Start or restart Maya if already opened
- Load MNPRX and activate it with your license key
Demo Scenes
You can download demo scenes for MNPRX in a variety of styles. To open them up, follow the instructions below.
- Download the desired demo scene
- Extract the files in a desired folder
- Set your Maya project to the folder where your demo scene is
Menu, File->Set Project - Open the demo scene
Menu, File->Open - Update the scene if required by the prompt after opening.
FAQ
I can’t install ‘only for me’
If the user-based installation doesn’t work, you can manually enter the required environment variable in the Maya.env file.
- Open the
Maya.envfile usually found inDocuments/maya/2020/Maya.envwith a text editor (make sure its the Maya.env file of the version of Maya you want to install in) - Enter this environment variable:
MAYA_MODULE_PATH=_#YOURMNPRXPATH#_(replace #YOURMNPRXPATH# with the path where MNPRX is located) - (Windows only) After entering the environment variables and restarting Maya, run this mel script within Maya:
setRenderingEngineInModelPanel "DirectX11" - Restart Maya.
I can’t install ‘for ALL users’
The installation for all users requires administrator rights in the computer where you are installing MNPRX in. This is because we need to put the module file within Program Files. To do this manually, follow the steps below:
- Duplicate the MNPRX.mod file within the MNPRX folder and open the duplicate with a text editor.
- Change all
./with the path to the MNPRX folder (with forward slashes) and save. - (Windows) Copy the edited MNPRX.mod and paste it in
C:/Program Files/Common Files/Autodesk Shared/Modules/Maya/2020(paste it in the Maya version that you want to install MNPRX in). - (Windows) Run this mel script within Maya:
setRenderingEngineInModelPanel "DirectX11" - Restart Maya.