Importing/exporting the stylization is crucial for professional production workflows and can be done with the Import/Export Tool. The tool windowcan be opened by clicking on the im/ex shelf icon.
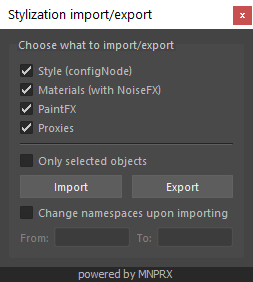
At the top of the Import/Export Tool, you will find the different options thereof.
- Style - mnprConfig node attributes.
- Materials - MNPRX materials with NoiseFX and material attributes.
- PaintFX - all painted effect parameters.
- Proxies - the geometry proxies, their material and painted effect parameters.
By default, the tool will export everything and import everything (if available in the exported files) into the current scene, without changing any namespaces.
Exporting
Exporting the stylization is quite intuitive:
- Check/uncheck the different options that you wish to export
- Check/uncheck if you want to only export the selected objects or all objects in the scene.
- Click on the
Exportbutton - Navigate to the directory where you want to save the stylization into and
Save.
The Style, Materials and PaintFX are saved as a *.json file, whereas the Proxies (if they exist) will be saved as an *.fbx file. These two files should always be in the same directory (folder) to be imported back successfully.
You only need to export the Style to transfer the stylization to Nuke.
Importing
Importing the stylization should always work, as long as the naming of objects is consistent.
- Check/uncheck the different options that you wish to import
- Check/uncheck if you want to only import onto the selected objects or all objects in the scene.
- Click on the
Importbutton - Navigate to the directory where you saved the stylization, select the *.json file and
Open.
The stylization can also be imported on scenes where there are no prior MNPRX materials, as long as names of the mesh objects remain consistent.
Changing namespaces
If you are importing the stylization from a scene that used different namespaces, you can check the Change namespaces upon importing checkbox.
- In the From field, you put the old namespaces (separate namespaces with a colon:
:) - In the To field, you put the new namespaces (separate namespaces with a colon:
:)
The first namespace in the From field will be changed to the first namespace in the To field. The second, with the second one, and so forth.