About MNPRX
What is MNPRX?
MNPRX is a real-time stylized renderer plugin (currently only for Autodesk Maya™) with an intuitive toolset for art-direction at different levels-of-control. Check out the available styles in our growing style library here.
Can I use MNPRX commercially?
Yes, with the MNPRX Indie Version (for private individuals and teams/small companies up to 10 employees) or MNPRX Studio Version (for big teams and companies with 11 employees and above), which can be purchased here.
Will MNPRX work on my system?
Currently, MNPRX is only available for Windows 10. For Linux (CentOS) and Mac, we can build MNPRX upon request for bulk purchases (more than 10+ licenses).
Is my computer strong enough to run MNPRX smoothly?
To run MNPRX smoothly, a modern graphics card (2+ GB is recommended). For higher resolutions and scene complexity, more is needed.
Can I transfer a license to another computer (floating license)?
Yes, this is possible, but only after 24 hours have passed from a previous activation. Read more about it here.
How can I cancel my subscription to avoid being rebilled?
You can cancel your MNPRX subscription by clicking on the Manage Your Orders link within the email that you get from FastSpring (our e-commerce platform). After cancelling, you can continue using MNPRX with the license that you purchased until the subscription expires. Afterwards, the license will return to Non-Commercial.
Can I change back to the normal viewport?

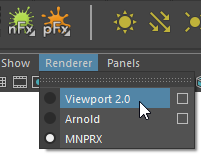
Yes, just change the viewport renderer from MNPRX to Viewport 2.0.
Installation
I can’t install ‘only for me’
If the user-based installation doesn’t work, you can manually enter the required environment variable in the Maya.env file.
- Open the
Maya.envfile usually found inDocuments/maya/2020/Maya.envwith a text editor (make sure its the Maya.env file of the version of Maya you want to install in) - Enter this environment variable:
MAYA_MODULE_PATH=_#YOURMNPRXPATH#_(replace #YOURMNPRXPATH# with the path where MNPRX is located) - (Windows only) After entering the environment variables and restarting Maya, run this mel script within Maya:
setRenderingEngineInModelPanel "DirectX11" - Restart Maya.
I can’t install ‘for ALL users’
The installation for all users requires administrator rights in the computer where you are installing MNPRX in. This is because we need to put the module file within Program Files. To do this manually, follow the steps below:
- Duplicate the MNPRX.mod file within the MNPRX folder and open the duplicate with a text editor.
- Change all
./with the path to the MNPRX folder (with forward slashes) and save. - (Windows) Copy the edited MNPRX.mod and paste it in
C:/Program Files/Common Files/Autodesk Shared/Modules/Maya/2020(paste it in the Maya version that you want to install MNPRX in). - (Windows) Run this mel script within Maya:
setRenderingEngineInModelPanel "DirectX11" - Restart Maya.
Activation
Re-activating MNPRX after activating another version
If you previously activated a Demo version and wish to activate another license, follow these steps:
- Delete the
MNPRX.licfile found in:- “Only for you” installations ->
Documents/maya/MNPRX.lic - “For all users” installations ->
Program Files/Common Files/Autodesk Shared/Modules/Maya/MNPRX.lic
- “Only for you” installations ->
- Start or restart Maya if already opened
- Load MNPRX and activate it with your license key
My activation failed with the activation code that was given
If for some reason activation fails, make sure to try the following:
- Double-check the entered activation code.
- Check that your subscription has not expired and that you have not activated all available licenses within the past 24 hours.
- Delete the license file to reset the license, restart Maya and try to activate again. The license file can be in two places depending on the MNPRX installation method.
- User-based installation:
- (Windows)
<username>/Documents/maya/MNPRX.lic
- (Windows)
- All-users installation:
- (Windows)
C:/Program Files/Common Files/Autodesk Shared/Modules/Maya/MNPRX.lic
- (Windows)
- User-based installation:
PaintFX
I deleted the construction history, how can I still animate PaintFX?
Animating PaintFX requires the construction history created with the vertex color sets to keyframe the values. You will need to recover the required construction history.
- Export the PaintFX with the Import/Export Tool.
- Delete the PaintFX using the MNPRX Toolbox.
- Add history ->
Edit Mesh->Transform - Import the PaintFX back in with the Import/Export Tool. The construction history will be in place and you can now animate the PaintFX values.
NoiseFX
Can I change the type of noise that NoiseFX uses?
Yes, but you will need to modify the material within the ShaderFX graph to do so.
- Remember which attribute is being modified within the material’s Stylization (procedural) section when modifying the desired NoiseFX values.
- Open the ShaderFX graph within the desired material.
- Change the CustomGraph node at the top-level from
falsetotrue. This will avoid overwriting your changes upon a ShaderFX update. - Navigate to:
Material -> ForwardRenderPasses -> Color-DiffusePass -> Control Sets -> Procedural Control -> X Procedural, whereXis the procedural attribute that modifies the desired effect. - Depending on what kind of noise algorithm you use, you can hook up your own nodes within the Noise2D or Noise3D node.
Can I add support of NoiseFX to my own custom ShaderFX materials?
Yes, you can add support of NoiseFX to your own custom ShaderFX materials.
- Import the mnpr_controlSets.sfx file (found on the shaders folder of your MNPRX installation), which contains all the nodes required to support NoiseFX.
- Plug them as the last targets of a Multi Pixel Shader node (4,5,6,7) for the styles to interpret them correctly.
You can take existing MNPRX materials as reference, the control sets can be found within the ShaderFX graph editor ->
Material -> ForwardRenderPasses -> Color-DiffusePass.
Rendering
The render comes out shifted when rendering with TAA
This will happen when the 2D Pan/Zoom is used in the camera you are rendering (Camera Shape Attributes -> Display Options -> 2D Pan/Zoom). We discourage from using this function with MNPRX at the moment, but we might add this in the future if requested by the community.
Troubleshooting MNPRX
My scene is all white once I load MNPRX
There are many reasons why this might be happening, we’ll list them up from most to less frequent
- The world scale is not properly set up for the scene.
- The scene might have been created with an older version of MNPRX and you need to update the materials.
- Your GPU may be running out of memory. This is unlikely, but can happen if a lot of textures are in the scene.
You may clamp the resolution of the textures to help alleviate this problem.
When working with many semi-transparent objects, they flicker from frame to frame
This is due to a Maya bug that we have reported to Autodesk (MAYA-105672). Fortunately, there is a workaround that will get depth sorting of transparent objects working with MNPRX.
- Navigate to this folder
C:\Program Files\Autodesk\Maya20XX\bin\ScriptFragment(replace the ‘XX’ with the version of Maya you are using in production). - Open up the
mayaTransparentDrawPass.xmlfile with a text editor that has administrator privileges. - Search for this line
<If value="@sortTransparent" />and comment it out like this:<!--<If value="@sortTransparent" />--> - Comment out the EndIf just underneath like this
<!--<EndIf />--> - Save the file and restart Maya to have depth sorting of transparent objects working with MNPRX.
The MNPRX shelf doesn’t show any buttons/icons
Because Maya automatically saves shelf files, using different versions of Maya with MNPRX can invalidate the shelf on older versions of Maya. This makes the buttons/icons disappear. Thankfully, it’s easy to solve this:
- Make sure all versions of Maya are closed
- Go to
Documents/maya/20XX/prefs/shelves(replace XX with the version of Maya that you are using) - Delete any
shelf_MNPRX.melfile that might exist there - Go to the shelves folder within the MNPRX directory:
MNPRX/shelves - Replace the
shelf_MNPRX.melwith a clean shelf file from theMNPRX.zipfile that you downloaded - Start Maya again and the shelf buttons should be there again
Objects are not casting shadows

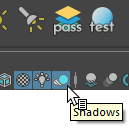
Make sure to enable shadows in the viewport. We have done a video tutorial on Working with Shadow Maps in the Maya Viewport, which explains how to make the most out of Maya’s shadow maps.
Some objects are missing when I render
Your GPU may be running out of memory. This can happen if you are rendering at big resolutions on a weak GPU or if a lot of textures are in the scene. You may clamp the resolution of the textures to help alleviate this problem.
Batch render completes without rendering anything
Maya’s Render→Batch Render tool is broken when MNPRX is in the MAYA_MODULE_PATH environment variable. This even happens when the plugin is unloaded, which seems quite odd (if you know why this is happening, we’d love to hear how we can fix this).
As an alternative, if you are using another renderer, please consider using Render→Render Sequence instead or batch rendering from the command line.
If you really need to use the Batch Render tool within Maya, temporarily delete the *MNPRX variables from the *Maya.env file, use the Batch Render tool and either place the variables back or re-install MNPRX.
If you don’t find your question here, feel free to reach out to us through the Artineers community