Rendering with MNPRX is a breeze compared to rendering with offline renderers, as every frame is calculated in real-time! In fact, computers normally take longer to save image files to disk than to render them.
There are many ways to get images out of Maya, but we strongly recommend the tools that we have developed to get the best and most consistent results, the Viewport Renderer (rendr icon in the MNPRX shelf) and the Target Sequence Renderer (tSeq icon in the MNPRX shelf). These two tools will allow you to render images of up to 16K resolution (16384×16384) with a graphics card supporting it. A tutorial using these tools can be found in the Rendering Scenes documentation.
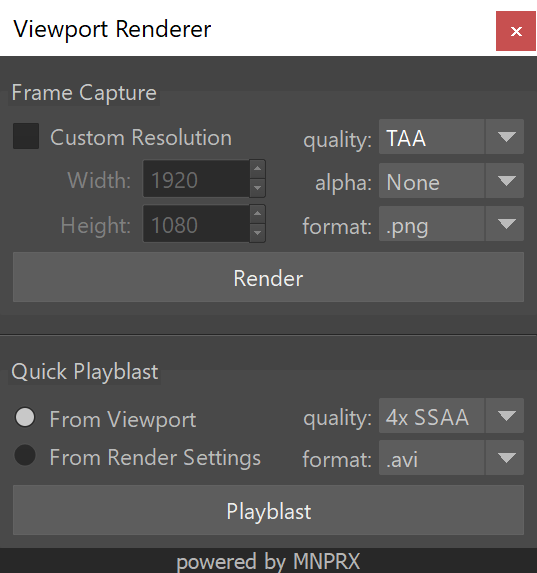
Viewport Renderer
The Viewport Renderer is a simple tool to render images and videos, divided into two sections: Frame Capture (save image) and Quick Playblasts (save video).
Frame capture
The upper section of the Viewport Renderer contains all options to capture a frame (image).
On the left side, you can define a custom resolution to render at. If left unchecked, the viewport resolution will be taken into consideration when rendering.
On the right side, you can find the settings to render with.
- Quality - Defines the quality of the viewport rendering and correlates with the quality settings of the configuration node. TAA gives the best visual quality and is the default in MNPRX.
- Alpha - Defines how the alpha (transparency) is handled in the rendered frames. The options are None (no alpha), Linear (linear alpha) and Premult. (premultiplied alpha).
- Format - Defines the image file format to save the image as i.e., .png, .jpg, .exr, .tif, .iff.
.exr images will be in linear space, so you will have to do the gamma correction yourself for the results to look as they appear in MNPRX.
The Render button will capture/render the frame in the directory you specify.
Quick Playblast
The lower section of the Viewport Renderer contains all options to create a quick playblast (video).
On the left side, you can define where to get the playblast resolution from. From Viewport will get the viewport resolution to playblast with. From Render Settings will get the Render Settings resolution to playblast with.
On the right side, you can find the settings to playblast with.
- Quality - Defines the quality of the viewport rendering and correlates with the quality settings of the configuration node. 4x SSAA gives the best visual quality within playblasts. To use TAA quality, you’ll have to render an image sequence with the Target Sequence Renderer tool and create the video yourself.
- Format - Defines the video file format to save the playblast as i.e., .avi, .mov (qt). The video file format will depend on what codecs your computer currently supports.
The Playblast button will playblast the video in the directory you specify.
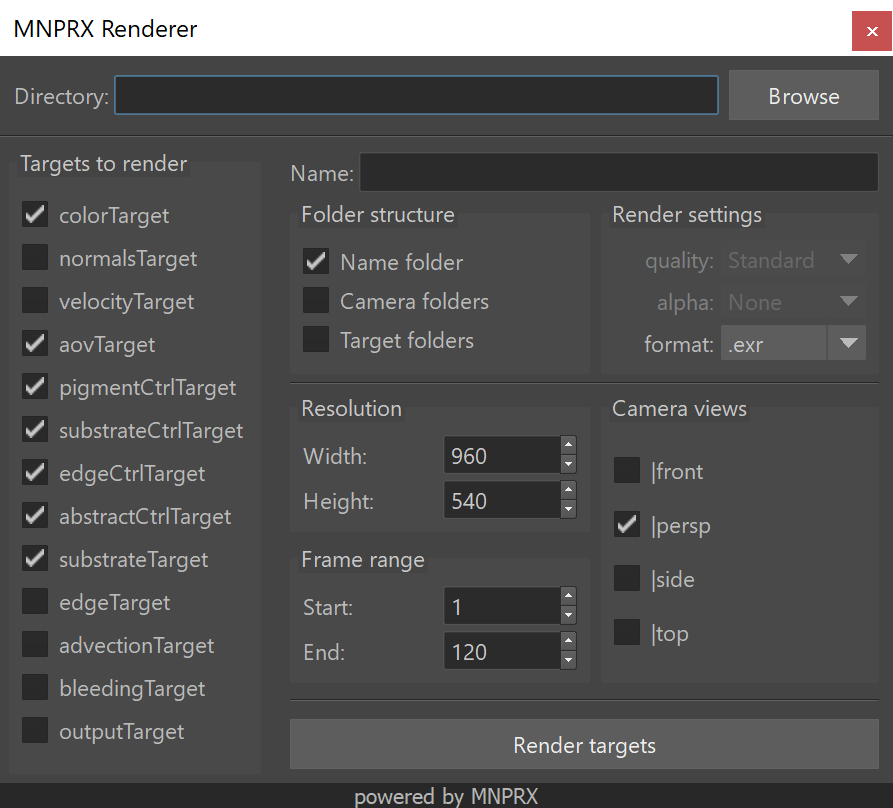
Target Sequence Renderer
The Target Sequence Renderer is a tool that allows to easily render any target/s as image sequences. The tool itself is divided into three sections: Directory, Targets and Settings.
Directory
The upper section of the Target Sequence Renderer allows you to specify where the image sequence is going to be saved in. By default, your current project’s directory will be set, but you can define any directory by clicking on the Browse button and navigating to your desired path.
Targets
The left section outlines all internal targets available to render. By default, all targets that are required to replicate the stylization in a compositing application are pre-selected. This allows you to have the same stylization in, for example, Nuke and have complete freedom to push the look further in comp. We’ve already replicated the watercolor and frayed stylization in Nuke.
Internal render targets (all except outputTarget) should be exported as .exr to preserve the embedded linear float data of each image.
When exporting the outputTarget, all other targets will automatically be disabled and the Render settings on the right section will be enabled. The quality and alpha can only be modified for the outputTarget.
Settings
The right section of the Target Sequence Renderer allows you to define all the sequence render settings. By default, the name will be that of your scene, but you can customize it however you want.
Folder structure defines the folders that will be created within the directory. By default, only a name folder will be created. Additional folders can be created, if desired, for each camera and target that you render. The hierarchy will look something like this directory/name/camera/target/image.ext.
Render settings allow you to customize the quality, alpha and format of the image sequence. It works in the same way as the Viewport Renderer’s Frame Capture settings.
- Quality - Defines the quality of the render and correlates with the quality settings of the configuration node. TAA gives the best visual quality and is the default.
- Alpha - Defines how the alpha (transparency) is handled in the rendered image sequence. The options are None (no alpha), Linear (linear alpha) and Premult. (premultiplied alpha).
- Format - Defines the image file format to save the image sequence as i.e., .png, .jpg, .exr, .tif, .iff.
Resolution allows you to define a custom resolution to render with. You can specify the width and height individually up to 16384 pixels, if your graphics card supports it. A dedicated GPU with 8GB of VRAM should be able to render images of up to 8K without too much trouble.
Frame range defines the start and end of the target sequence in the timeline.
Camera views outlines the available cameras in the scene and allows you to select which views you want to render the sequence through. By default, all cameras set as ‘renderable’ in Maya’s Render Settings will be selected.
The Render targets button will start rendering the target sequence with the settings you specified. You can cancel the sequence render anytime by hitting on cancel within the render progress dialog.
FAQ
The render comes out shifted when rendering with TAA
This will happen when the 2D Pan/Zoom is used in the camera you are rendering (Camera Shape Attributes -> Display Options -> 2D Pan/Zoom). We discourage from using this function with MNPRX at the moment, but we might add this in the future if requested by the community.